Wednesday, April 26, 2017

The Door That Keeps On Giving


Last fall, one of our IEL instructors approached me and asked if I could make a sliding barn door for her loft in downtown Chicago. After a little research, I agreed. She found a restoration outlet that sold her the reclaimed barn wood and brought it to school. Being that I am still shopless, I worked on the door at Kipp's and Tony's garages. The design of the door was simple, but milling the wood was tricky as there were still a lot of very old and rusty nails everywhere. I managed not to nick my planer blades and got them to reasonably uniform thickness (I do love working with "rustic" projects as imperfections are part of the deal, whether I made them or not). I attached the cross boards to a piece of 1/2 in plywood then attached the outside trim. Finally, I placed a nice, clean piece of 1/4 inch plywood over the back so she can paint or stain the back. Tony helped me deliver the door to her loft and we are just waiting for pictures after she finishes it and her handyman hangs it on a rail. I think it looks great as it is.

While I was working on this project, I found a design for a condiment/beer caddy that I really liked. I made the first out of walnut, but then decided to make an industrial influenced caddy for Kipp. I used scraps from the door an some hardware from Home Depot. Funky but cool (not referring to Kipp btw).


A few weeks ago, Carmela, Meg, and Nina went to and Adult Ed conference in southern Illinois. While there, they stopped into a craft shop and noticed a crayon holder made from a block of wood. I guess they liked it, because Carmela came back and asked me if I could build one for Nina's kids. By coincidence, I had some left over wood from the door project that was perfect. I cut it down and laminated two pieces to make a three 3.5 by 3.5 blanks. The wood was really chewed up (100+ years on an old barn will do that) and I knew they would look neat for people that like that kind of stuff. Tony helped me drill two inch holes in the blanks then I spent four or five days sanding them and applying polyurethane. I bought some crayons and brought the three holders in the other day.


Carmela gets the smaller version as Kiera is her only grandchild to date


Hortencia, who sometimes has to stop and count how many kids she has, gets the most rustic version. Tony chose it.


Nina gets the other larger one for her three kids.

I have a few more ideas for these small craft project for the near future. Stay tuned :)

Thursday, April 20, 2017

Cool Caddy

My Condiment/Beer Caddy

I came across the plans for this backyard barbecue accessory on a woodworking website. It is a clever idea with some fun woodworking challenges. After a long perusal of dozens of different woods, I choose walnut for my prototype. With a little Tung Oil, it really came alive. I made a bunch of mistakes that I will avoid in the future, but it still looks good enough to give to a friend. To sweeten the gesture, I filled it up with many of my favorite Caribbean sauces and a bottle of Ting. I prefer it as a condiment caddy, though I cannot swear it won't find other utility. I think I will make several of these for friends this summer :)


Sunday, April 9, 2017

Kipp's Hipster Mid-Century Modern Console/Bookcase

Kipp and Rose bought a house a few months ago that was built and embellished somewhat eccentrically by a man who loved wood and mid-century (1950's) decor. After we put in a few hickory hardwood floors in the upstairs bedrooms, we decided to tackle a mid-century console/bookcase that he had found in a book. The floors proved to be challenging but they turned out great:


While we were doing the upstairs floors, they had a professional crew come in and install oak flooring in the living and dining rooms. Now it was time for the new piece of furniture. Even though the design of the console was very simplistic, there were some difficult parts to the process. The basic case is made from cherry plywood and the trick there was getting all four 45 degree corners to line up. We edge banded the plywood and tried out a few new techniques to add wooden fasteners to the case. The base is made of solid cherry with pocket screws connecting the runners and legs. Finally, we used my favorite formula for a stain - 3 parts tung oil, one part boiled linseed oil, and a few splashes of denatured alcohol. It really darkened the cherry nicely and it will continue to darken with age. We finished it with a few coats of wipe on polyurethane and some furniture wax. 


I have become a vagabond woodworker - having no real shop, I squat in the garages and basements of friends. Here we are working in Kipp's garage on his console and Patricia's sliding barn door.


Kipp is ironing here; anyway, he is attaching the edge banding to the sides of the plywood with a heat-activated veneer.


The edge banding is slightly wider than the plywood so we trimmed some of it with a flush trimming router bit. I did revert back to my favorite block plane to do the rest of it.


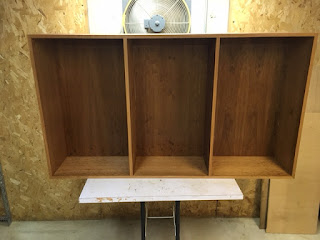
The case built with the dividers installed and the first coat of oil.


The base is a bit unusual, as the Scandinavian design called for it to be smaller than the case.


The finished console/bookcase attached and sitting pretty on top of the new oak floor in the dining room. 


Rose was ready and had it adorned in no time at all. I have to admit, even though it is kind of hipster doofusish, it looks really nice.

Kipp's next project is to gut and restore a mid-century stereo console he bought last week. I will probably help him with the internal woodworking bits. For me, I hope to get the last bit of wood to finish the sliding barn door, then move on to something new :)